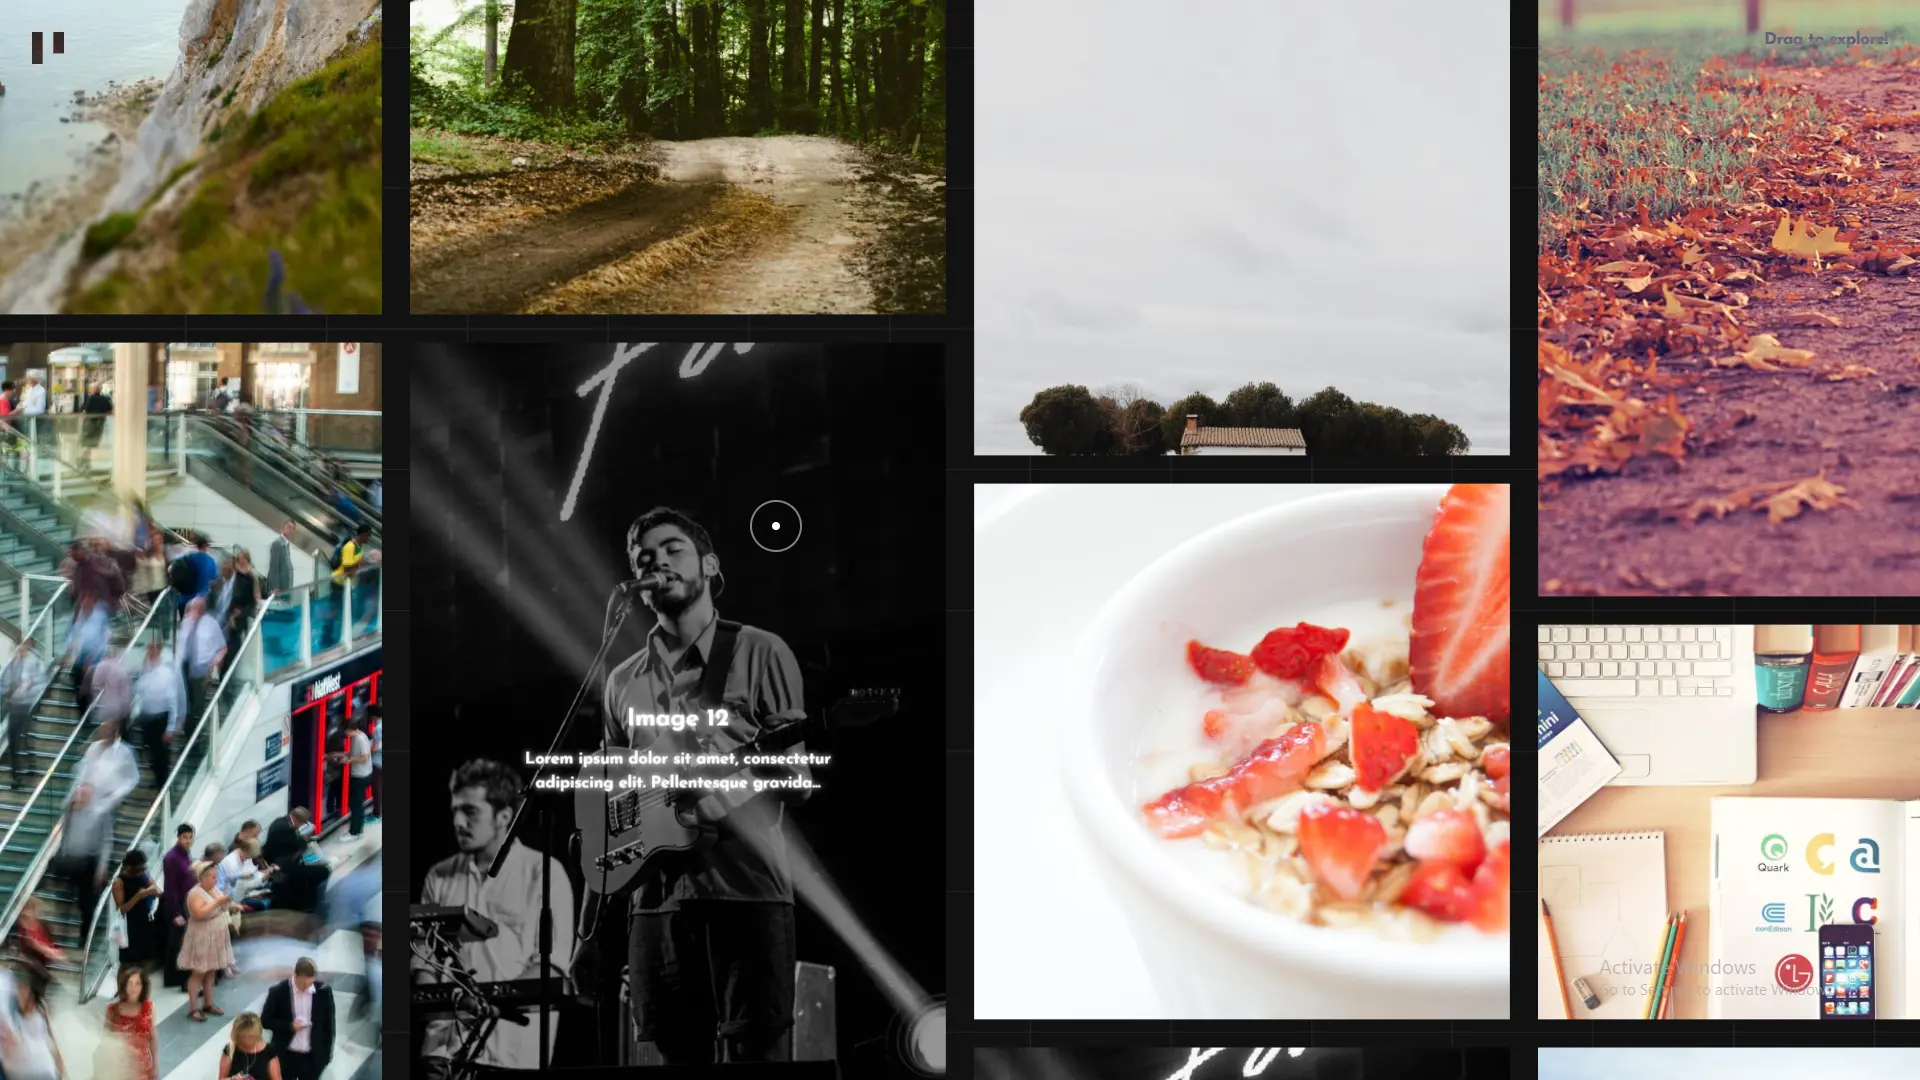
As I was looking for inspiration on Awwwards, I came across this beautiful little site: Bien Joué. The site features an infinite image gallery in a 3D space, with some amazing WebGL effects on user interactions.
The infinite gallery fascinated me, and I wondered if I could re-implement the gallery-part with react-three-fiber. After some experiment & fumbling around, I was able to put out a small “demo-able” app:
It was a fun & challenging project, and I want to share my approach with you in this small memo. I’ll write about what I think are the two core problems we’d need to solve to make an infinite gallery possible:
- How to build an infinite gallery
- How to handle mouse events to move around & create some WebGL effects
Head-ups
Before jumping in the main points, you should know that I’ll only be discussing the above-mentioned problems on a “concept” level. I’ll not go into any actual technical implementation, nor do I think I should.
I use react-three-fiber for the re-implementation, but with the concepts worked out, I believe you can also create similar solutions with other libraries & languages.
Understanding the core logic & effects
I suggest you take a look at my demo app first to have better visualization of the 2 problems I have mentioned above. Again, they are:
Build an infinite gallery:
- The gallery space is indefinite (no boundary) and user can navigate around with mouse interactions
- No matter which direction they go (vertical, horizontal, diagonal), there will always be images to display
Handle mouse events:
- User can click & drag to move around
- On mouse-down, there will be some distortion effect on the images, depending on their distance to the center of the screen

Building the infinite gallery
Let’s say we have an original image grid. Building this grid is simple & totally up to your preferences, so we’ll skip this step. For example, in my app, I use a 6 x 5 image grid, with a little offset among the columns to create a masonry-style one.
Idea
Basically, we want a gallery space that expands indefinitely.
The most brute solution I could think of is to duplicate & render more images when needed, but that would also bring up horrendous performance issues, and a session probably wouldn’t last very long before crashing.
Such solution is clearly not viable. Therefore, I try to use a technique that is pretty common in infinite sliders:
- Duplicating the original slides & put them before/after the original ones
- Re-calculating all images’ position on slide change, to create an “endless” feel
Performance-wised, it’s fantastic. The question now is how to adapt it to fit the problem on hand.
Solution
After putting in some thoughts, I decided to go for the below approach:
- Generate the image grid & save every image’s position. We’ll not be updating their position because that would be really heavy, but they will be needed for future WebGL calculations.
- In stead of tracking every single image’s position, I’ll track the position of them all as a group. This is obviously better for performance, as well as keeping track of the whole grid’s position is clearly cleaner & easier than tracking every single image.
- We’ll be duplicating the whole image grid. As a result, I ended up with 3x3 = 9 grids in total, vertically and horizontally, with the original grid in the center:
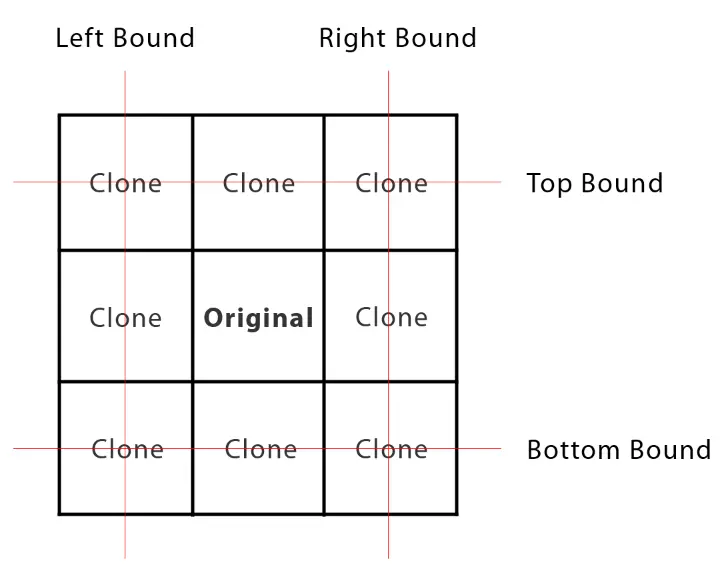
We will also keep track of all 9 grids’ order: which is the center grid, which are the clones (the boundary grids), and their respective positions. This is important.
- On the other hand, we will also keep track of the user’s current “look-at” position (think of this like a camera), which I see as the center point - the center of the screen. While user is navigating, in a way we can also say that the user is moving the center point around. By default, the user will be looking at the center grid.
- Now upon user navigation, we’ll be calculating if the center point is close to the boundary grids, and updating the whole boundary (each grid in the column/row) when needed. For example, if the user is moving past the right boundary, we will update the left column’s position to be after the right bound:
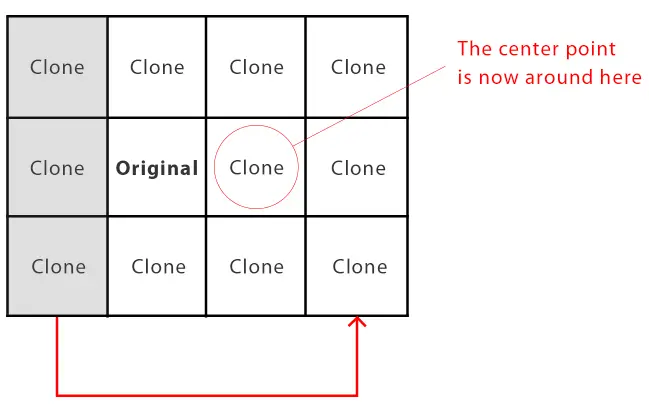
After the position update, we will also update the 9 grids’ order: re-calculating again which one is now the center and which ones belong to the bounds.
- Keep tracking the center point, rinse & repeat!
Using the above-mentioned logic, we can make sure that the user is always looking at the center grid, and the boundary grids that surround it will always be updated to follow the user’s “look-at” position. This will create a feeling that the gallery is infinite, while in fact, there are only 9 grids moving around.
Handle mouse events (create WebGL effects)
This one issue is, fortunately, a tad easier to solve than the first. My approach is:
- Use a global mousemove event listener to calculate the movement distance on user navigation, and update the position of the center point accordingly.
- Upon center point position update, also run the flow to update the grids’ position accordingly
- Create some WebGL effects depending on the center point position & the distance between each image to the center point. Remember I said that each image’s position is needed for future WebGL calculations? Well here it is.
You might be wondering how to calculate the distance because I said that we’d not be updating the images’ position. But in fact, we actually do! Because we are keeping track of the grids, while:
- The images’ position are relative to the grid that contain them
- The grid’s position are relative to the global position
Having both the image and the grid’s position, we can calculate the image’s exact global position. Now calculating the distance between them & the center point is a breeze.
The WebGL effects
I want an effect like this graph (also similar to the effect seen on Bien Joué):
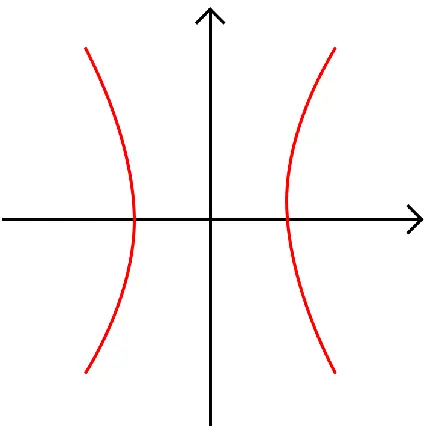
You can see that the further a point is from the center point, the greater the distortion, thus the need to calculate the distance between each image and the center point. You can see my demo for a better visualization.
Shader is a complicated topic, so I’ll not be going into the detailed shader implementation. For anyone that’s interested, please refer to my shader file.
Conclusion
Since I have mentioned that I’ll only be taking the core problems on a concept level, please forgive me if I have skipped too much on the technical aspect. All in all, it was a fun journey exploring how to build up a solution for an infinite gallery with r3f. The result came out better than I expected, though some performance issues are still around.
If you are interested in the details of my implementation, please refer to my Github repo.
