In recent years, Kubernetes has exploded tremendously. At the same time, it creates new communities including ecosystems that make it easier to develop and deploy complex applications. If Kubernetes means the shipman of the ship, then Helm is the steering wheel of that shipman in the career of every DevOps and Developer.
Helm is a Package Manager for Kubernetes, analogous to NPM or YARN. However, it’s not just the Package Manager, it is also a Deployment Management for Kubernetes. In simpler terms, instead of having to define various Kubernetes resources to deploy an application, with Helm you just type a few commands in the terminal and enter, done.

In this article, we will learn about Helm, a powerful tool that makes life working with Kubernetes easier than ever. Although these terms are quite common with developers today, we will skim a jiffy for those who don’t know:
- Containerization: a next-generation virtualization and automation solution after Hypervisor Virtualization. It widely applied today because of the breakthrough effect with outstanding advantages in creating and deploying applications faster, more scalable and more securely than traditional methods.
- Docker: a number one software to create, manage and run containers. Most chosen for all popular Containerization applications today. Many large cloud solutions like Google Cloud, Amazon Web Services, Microsoft Azure are using it.
- Kubernetes: a famous open source used for container orchestration. With the rise of Containerization, the management and coordination of container-based applications became complicated and difficult, making Kubernetes an effective and indispensable solution for systems using Containerization
Helm Overview
Concepts
Helm has 4 basic concepts:
- Chart: a collection of YAML files; bundle of the Kubernetes resources needed to build a Kubernetes application. For ease of visualization, Helm Chart can be compared like a Docker Image. Of course, Helm also has a Helm Hub where to search and share Charts for popular apps

- Config: a configuration in the values.yaml file, which contains configuration explicit to a release of Kubernetes application. It can be the config for service, ingress, deployment, etc. until specific applications such as Kafka, Consul, Vault, NATS-streaming, etc.

- Release: a chart instance is loaded into Kubernetes. It can be viewed as a version of the Kubernetes application running based on Chart and associated with a specific Config.

- Repositories: a repository of published Charts. These can be private repositories that are only used within the company or public through the Helm Hub. Some Charts may have different versions of many companies or publishers. Particularly, Charts in a Stable repository must always meet the criteria from the Technical Requirements of Helm.

Architecture
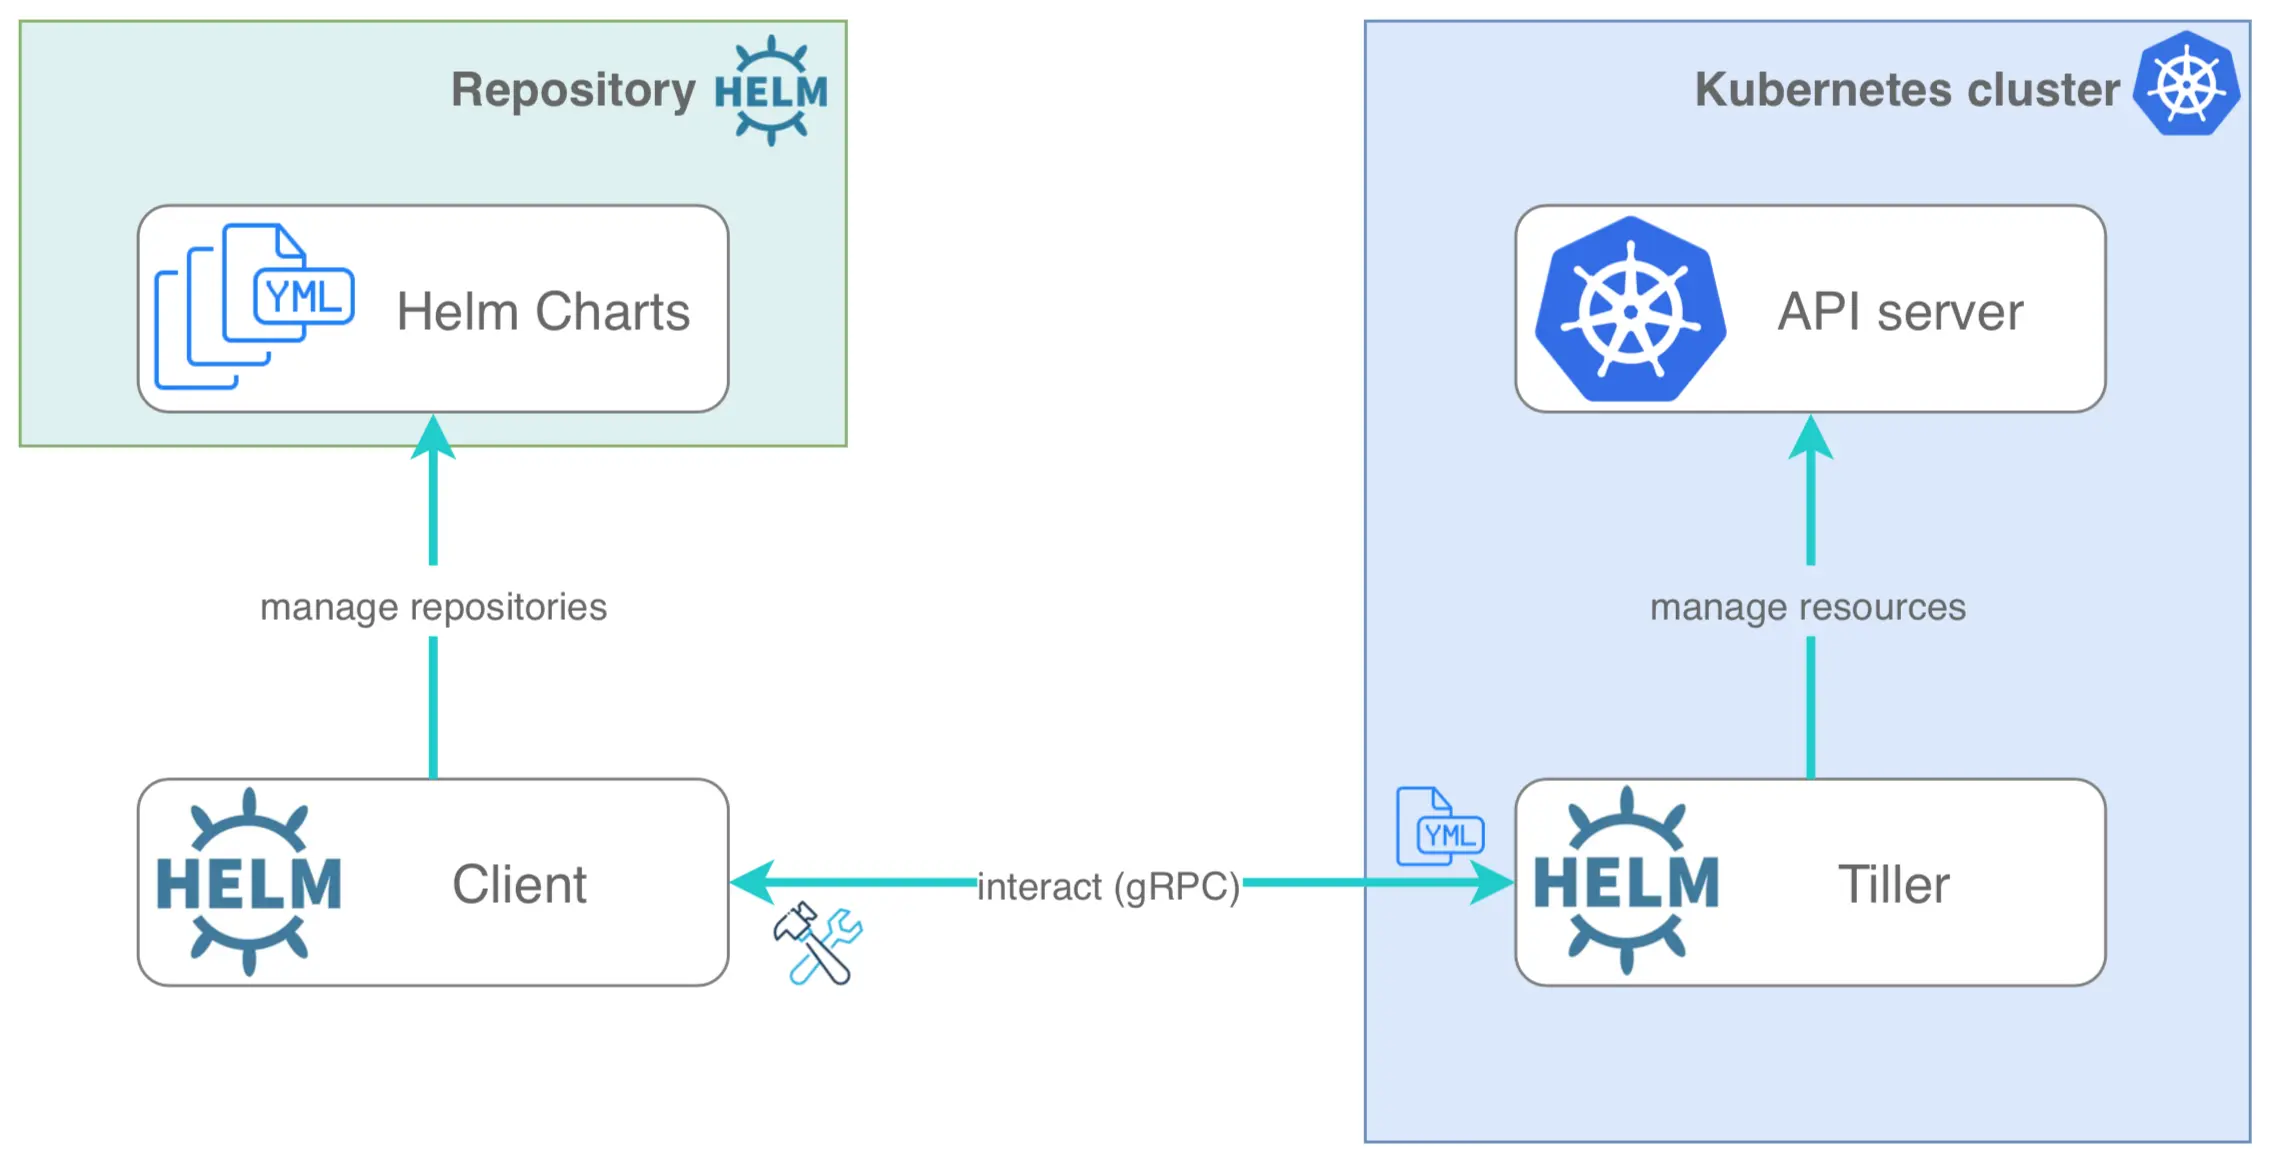
Helm has a fairly simple client-server architecture, including a CLI client and an in-cluster server running in the Kubernetes cluster:

- Helm Client: Provides the developer to use it a command-line interface (CLI) to work with Charts, Config, Release, Repositories. Helm Client will interact with Tiller Server, to perform various actions such as install, upgrade and rollback with Charts, Release.
- Tiller Server: an in-cluster server in the Kubernetes cluster, interacting with the Helm Client and communicating with the Kubernetes API server. Thus, Helm can easily manage Kubernetes with tasks such as install, upgrade, query and remove for Kubernetes resources.
Here are some basic concepts and architectures to help you understand and grasp Helm more quickly. In the next section, we’ll take some tutorials to deep dive into Helm. Let’s do it!
Helm in Action
Before we begin, we’ll need to prepare a few things for us to be able to practice with Helm.
- Firstly, we need a Kubernetes cluster. At Dwarves Foundation, we’re using the Google Kubernetes Engine for a production environment and the Kubernetes on-premise for a staging environment. If you don’t have any Kubernetes cluster, don’t worry. You can use Minikube, which offers an excellent way to work with a single-node Kubernetes cluster locally.
- And, we’ll need a basic purpose that manages the application within the Kubernetes cluster. In fact, I have a responsibility for overseeing and configuring Sol, the Travel Log product of the Dwarves Foundation. It using Kafka as a message streaming for communication between its’ microservices. For this tutorial, we’ll install Kafka to the Kubernetes cluster via Helm.
Installing Helm
There are multiple ways to install Helm that are obviously described on the Helm documentation. Helm has two parts: The Helm client (helm) and the Helm server (Tiller). The quickest way to install helm on macOS is using Homebrew, a package manager for macOS platforms.
It's a simple command to install Helm client locally via Homebrew
brew install kubernetes-helm
Next step is to initialize helm, please ensure that the Kubernetes cluster is running and accessible through kubectl. When you initialize helm, a deployment named tiller-deploy will be deployed in the kube-system namespace.
Initialize helm using the following command.
helm init
Check the tiller deployment in the kube-systems namespace using ***kubectl ***command
kubectl get deployment tiller-deploy -n kube-system
Deploy an Application using Helm
Now we’re going to deploy a Kafka cluster using helm.
It’s many charts of Kafka when we search on the Helm Hub. Unfortunately, Kafka doesn’t have a Stable chart, so you can choose which one fits with your use case. For this tutorial, we’ll install the Kafka chart of Bitnami into queue-production namespace.
As a simple way, we can install Kafka with helm by the following command
# Add Incubator repository
helm repo add bitnami https://charts.bitnami.com/bitnami

# Update helm repository
helm repo update

# Install Kafka
helm install bitnami/kafka --name kafka --namespace queue
Now, it already installed on your Kubernetes cluster, but it may not work properly for your needs. For me, I usually looking for a values.yaml file, and store it locally to save a specific configuration for instance of the application.

Execute the following helm install command to deploy a Kafka with your Config in values-prod.yaml. It will download the Kafka helm chart from the Bitnami repo and apply your configuration via values.yaml file.
helm install bitnami/kafka \
  --name kafka-prod \
  --namespace queue-production \
  -f bitnami/values-prod.yaml

Check the install helm chart using this command
helm ls
Delete the installation from Kubernetes cluster, use this command
helm delete --purge kafka-prod
Conclusion
We’ve witnessed the ecosystem around Kubernetes blossom, and new tools are appearing every day. Helm is an essential tool for DevOps and Developer using Kubernetes in their production environment. Tools like Helm are often used when considering quick deployment strategies and cost savings in operations.
You can refer to more information in the documentation of Helm. In the next article, I will show you how to create a Helm Chart of NATS-streaming. Hopefully, this article will help you who are intending to learn about Helm as well as the necessary tools of the DevOps. Thank you, please give me your commend if there are deficiencies and I will do better in the next articles.
